Everything about how the engine works: the JVL language, how a project is organized, and how to use the visual 2D and 3D editors. For the full function-by-function API reference with examples, see Code & API.
Visual Java is a desktop IDE built on top of the regular Java toolchain — it doesn't invent a new runtime, it makes an existing one visible and easier to reach. Every project you build is, underneath, a normal Java program; Visual Java's job is to generate that program for you from two sources at once: the scenes you build visually, and the .jvl code you write.
When you press Run, four things happen in order:
.jvl file in main/jvl is scanned into a shared class registry, so files can call each other's methods before any of them is translated.System.print, …) into plain, compilable Java, and injects the runtime API classes (VJObject, Scene, Camera, Mouse, Physics, and friends) so your code can call them without imports..jvl line numbers and shown in the Console and inline in the editor.ProgramFrame for 2D, a jMonkeyEngine app for 3D), and its output — including scene commands — streams back into the Console in real time.JVL is not a separate language with its own runtime — it's a thin, transpiled layer over Java. A file that doesn't look like the new syntax (for example one that already uses extends) is left as ordinary Java and compiles unchanged. You can always drop down to plain Java when you need something JVL doesn't model yet.
The Scene Editor (2D or 3D) and the code editor are two windows onto the same objects. Placing a rectangle in the Scene Editor and setting its color in the Inspector sends the exact same kind of scene command (OBJ_CREATE, OBJ_COLOR, …) that calling player.setColor(...) from JVL would send at runtime. That's why an object built visually can be picked up from code with VJObject.load(...), and an object built in code shows up live in the running scene.
2D projects render with a custom Graphics2D canvas (ProgramCanvas) that understands shapes, images, glow, rotation and layers. 3D projects render through jMonkeyEngine (Jme3SceneApp), with a fly camera for editing, a transform gizmo, ambient/fog settings and an optional pixelation filter for a retro look.
Visual Java è un IDE desktop costruito sopra il normale toolchain Java — non inventa un nuovo runtime, rende visibile e più accessibile uno già esistente. Ogni progetto che costruisci è, sotto il cofano, un normale programma Java; il compito di Visual Java è generare quel programma per te a partire da due fonti contemporaneamente: le scene che costruisci visivamente e il codice .jvl che scrivi.
Quando premi Run, accadono quattro cose in ordine:
.jvl in main/jvl viene scansionato in un registro di classi condiviso, così i file possono chiamare i metodi l'uno dell'altro prima che uno qualsiasi venga tradotto.System.print, …) in Java normale e compilabile, e inietta le classi dell'API runtime (VJObject, Scene, Camera, Mouse, Physics e altre) così il tuo codice può chiamarle senza import..jvl e mostrati nella Console e in linea nell'editor.ProgramFrame per il 2D, un'app jMonkeyEngine per il 3D), e il suo output — inclusi i comandi di scena — arriva in tempo reale nella Console.JVL non è un linguaggio separato con un proprio runtime — è un sottile livello tradotto sopra Java. Un file che non assomiglia alla nuova sintassi (ad esempio uno che usa già extends) viene lasciato come normale Java e compila senza modifiche. Puoi sempre scendere a Java puro quando ti serve qualcosa che JVL non modella ancora.
L'editor di scena (2D o 3D) e l'editor di codice sono due finestre sugli stessi oggetti. Posizionare un rettangolo nell'editor di scena e impostarne il colore nell'Inspector invia lo stesso tipo di comando di scena (OBJ_CREATE, OBJ_COLOR, …) che invierebbe a runtime la chiamata player.setColor(...) da JVL. Per questo un oggetto creato visivamente può essere ripreso da codice con VJObject.load(...), e un oggetto creato da codice appare live nella scena in esecuzione.
I progetti 2D vengono renderizzati con un canvas Graphics2D personalizzato (ProgramCanvas) che gestisce forme, immagini, glow, rotazione e layer. I progetti 3D vengono renderizzati tramite jMonkeyEngine (Jme3SceneApp), con una fly camera per l'editing, un gizmo di trasformazione, impostazioni di ambiente/nebbia e un filtro opzionale di pixelazione per un look retro.
JVL (Visual Java Language) is what you write in .jvl files. It looks like Java with the ceremony sanded off: no access modifiers to choose, no boilerplate public static void main, and a small set of extra rules for events and parameters.
Declare a class with just class Name { } — no public, no extends required. Anything declared directly inside the braces, outside a method, becomes a class field:
class Main {

    int score = 0;
    boolean gameOver = false;

    void Main(String[] args) {
        System.print("Hello from Main!");
    }
}The program's real main() is the method literally named Main inside a class literally named Main — void Main(String[] args) { ... }. Every new project template starts from this shape.
Put one of these annotations directly above a method to hand it to the runtime's event loop — you never call these methods yourself:
| Event | Fires |
|---|---|
@onStart | Once, when the scene/program starts. |
@onUpdate | Every frame (~60 times per second). |
@onDestroy | Once, when the object or program is being torn down. |
@onClick | On a mouse click. |
@onMouseMove | Whenever the mouse moves. |
@onKeyPress | On a key press, with the key passed to the method. |
@WhenStartClone | Once, on each clone created from this object. |
@onUpdate
void tick() {
    if (KEY_RIGHT) player.moveX(4);
    if (KEY_LEFT)  player.moveX(-4);
}Any bare KEY_NAME used as a boolean condition (KEY_LEFT, KEY_RIGHT, KEY_UP, KEY_DOWN, KEY_SPACE, letter and number keys, …) is automatically resolved against the current keyboard state — no Keyboard.isDown(...) boilerplate.
Call a method with name = value pairs in any order; JVL reorders them onto the method's real signature for you:
Enemy.spawn(x = 200, y = 40, speed = 3);
// is rewritten to match Enemy's real method signature, in the order it was declaredCall a method on another class the same way you'd call a local one, using the class name as a prefix: Enemy.tick();. Calling a class name with no arguments and no method, like Enemy();, runs every no-argument, non-event method that class declares, in the order they're written — a shortcut for a class that's really just a sequence of setup steps.
System.print(...) is JVL's console output — it becomes System.out.println(...). Calling .sleep(ms) on an object other than System/Thread pauses that object's own timeline without blocking the render loop; use System.sleep(ms) or Thread.sleep(ms) when you do want to block, e.g. inside a manual game loop.
If a file uses extends/implements right after the class name, or doesn't contain a recognizable class Name { at all, Visual Java assumes it's already plain Java and leaves the structure untouched (only small substitutions like System.print still apply). This is intentional: it means hand-written Java and JVL can live side by side in the same project.
JVL (Visual Java Language) è ciò che scrivi nei file .jvl. Assomiglia a Java a cui è stata tolta la burocrazia: nessun modificatore di accesso da scegliere, nessun boilerplate public static void main, e un piccolo insieme di regole aggiuntive per eventi e parametri.
Dichiara una classe con solo class Nome { } — niente public, niente extends obbligatorio. Tutto ciò che viene dichiarato direttamente dentro le graffe, fuori da un metodo, diventa un campo della classe:
class Main {

    int score = 0;
    boolean gameOver = false;

    void Main(String[] args) {
        System.print("Hello from Main!");
    }
}Il vero main() del programma è il metodo chiamato letteralmente Main dentro una classe chiamata letteralmente Main — void Main(String[] args) { ... }. Ogni nuovo template di progetto parte da questa struttura.
Metti una di queste annotazioni direttamente sopra un metodo per affidarlo al loop di eventi del runtime — questi metodi non li chiami mai tu stesso:
| Evento | Si attiva |
|---|---|
@onStart | Una volta, all'avvio della scena/programma. |
@onUpdate | Ogni frame (~60 volte al secondo). |
@onDestroy | Una volta, quando l'oggetto o il programma viene distrutto. |
@onClick | A un click del mouse. |
@onMouseMove | Ogni volta che il mouse si muove. |
@onKeyPress | Alla pressione di un tasto, passato come parametro al metodo. |
@WhenStartClone | Una volta, su ogni clone creato da questo oggetto. |
@onUpdate
void tick() {
    if (KEY_RIGHT) player.moveX(4);
    if (KEY_LEFT)  player.moveX(-4);
}Qualsiasi KEY_NOME usato come condizione booleana (KEY_LEFT, KEY_RIGHT, KEY_UP, KEY_DOWN, KEY_SPACE, tasti lettera e numero, …) viene risolto automaticamente rispetto allo stato attuale della tastiera — niente boilerplate Keyboard.isDown(...).
Chiama un metodo con coppie nome = valore in qualsiasi ordine; JVL le riordina sulla firma reale del metodo per te:
Enemy.spawn(x = 200, y = 40, speed = 3);
// viene riscritto per corrispondere alla firma reale del metodo di Enemy, nell'ordine in cui è stata dichiarataChiama un metodo su un'altra classe come faresti con uno locale, usando il nome della classe come prefisso: Enemy.tick();. Chiamare un nome di classe senza argomenti e senza metodo, come Enemy();, esegue tutti i metodi senza argomenti e non-evento dichiarati da quella classe, nell'ordine in cui sono scritti — una scorciatoia per una classe che è in realtà solo una sequenza di passi di setup.
System.print(...) è l'output console di JVL — diventa System.out.println(...). Chiamare .sleep(ms) su un oggetto diverso da System/Thread mette in pausa la timeline di quell'oggetto senza bloccare il ciclo di rendering; usa System.sleep(ms) o Thread.sleep(ms) quando vuoi davvero bloccare, ad esempio dentro un game loop manuale.
Se un file usa extends/implements subito dopo il nome della classe, o non contiene affatto un class Nome { riconoscibile, Visual Java presume che sia già Java puro e lascia la struttura invariata (si applicano solo piccole sostituzioni come System.print). È intenzionale: significa che Java scritto a mano e JVL possono convivere nello stesso progetto.
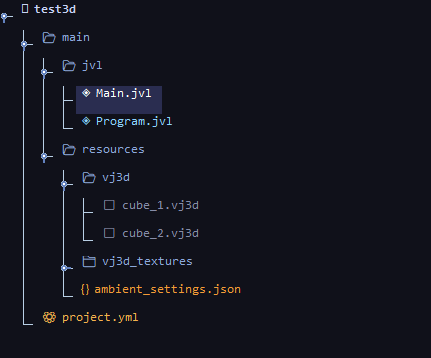
Every project has the same shape, mirrored exactly by the Explorer panel:
| Layout | |
|---|---|
project.yml | Project settings: name, render mode (2D/3D), main class, Java target, window size. |
main/jvl/ | Your .jvl source files — Main.jvl is created automatically, add more per class. |
main/resources/ | Images, sounds, saved scenes and .vj objects placed with the Scene Editor. |
project.ymlThis single file is the project's configuration: it's what tells Visual Java whether to open the 2D or 3D Scene Editor, which class holds Main, and which Java language level to compile against. You rarely edit it directly — the New Project wizard and the editors keep it in sync — but it's plain YAML if you ever need to.
.vj files and saved scenesWhen you place and configure an object in the Scene Editor and click Apply Modifications / Save Scene, its transform, color, texture and other Inspector fields are written to a small resource file under resources. From code, VJObject.load("player", "resources/vj/player.vj") reads that same file back into a live object — see Objects.
You can split logic across several .jvl files (for example Main.jvl and Client.jvl); the preprocessor scans all of them together before translating any single one, so a method or a named-parameter call in one file can reference a class declared in another without extra imports.
Ogni progetto ha la stessa forma, rispecchiata esattamente dal pannello Explorer:
| Struttura | |
|---|---|
project.yml | Impostazioni del progetto: nome, modalità di rendering (2D/3D), classe principale, target Java, dimensioni finestra. |
main/jvl/ | I tuoi file sorgente .jvl — Main.jvl viene creato automaticamente, aggiungine altri per ogni classe. |
main/resources/ | Immagini, suoni, scene salvate e oggetti .vj posizionati con l'editor di scena. |
project.ymlQuesto unico file è la configurazione del progetto: dice a Visual Java se aprire l'editor di scena 2D o 3D, quale classe contiene Main, e a quale livello di linguaggio Java compilare. Raramente lo modifichi direttamente — la procedura guidata Nuovo Progetto e gli editor lo tengono sincronizzato — ma è YAML semplice se mai ne avessi bisogno.
.vj e scene salvateQuando posizioni e configuri un oggetto nell'editor di scena e clicchi Apply Modifications / Save Scene, la sua trasformazione, colore, texture e gli altri campi dell'Inspector vengono scritti in un piccolo file risorsa sotto resources. Da codice, VJObject.load("player", "resources/vj/player.vj") rilegge lo stesso file in un oggetto vivo — vedi Oggetti.
Puoi dividere la logica su più file .jvl (ad esempio Main.jvl e Client.jvl); il preprocessore li scansiona tutti insieme prima di tradurne uno qualsiasi, quindi un metodo o una chiamata con parametri nominati in un file può riferirsi a una classe dichiarata in un altro senza import aggiuntivi.
The 2D Scene Editor is where you lay out what a scene looks like before writing a single line of behaviour. It opens in the Scene 2D tab, next to your code tabs.
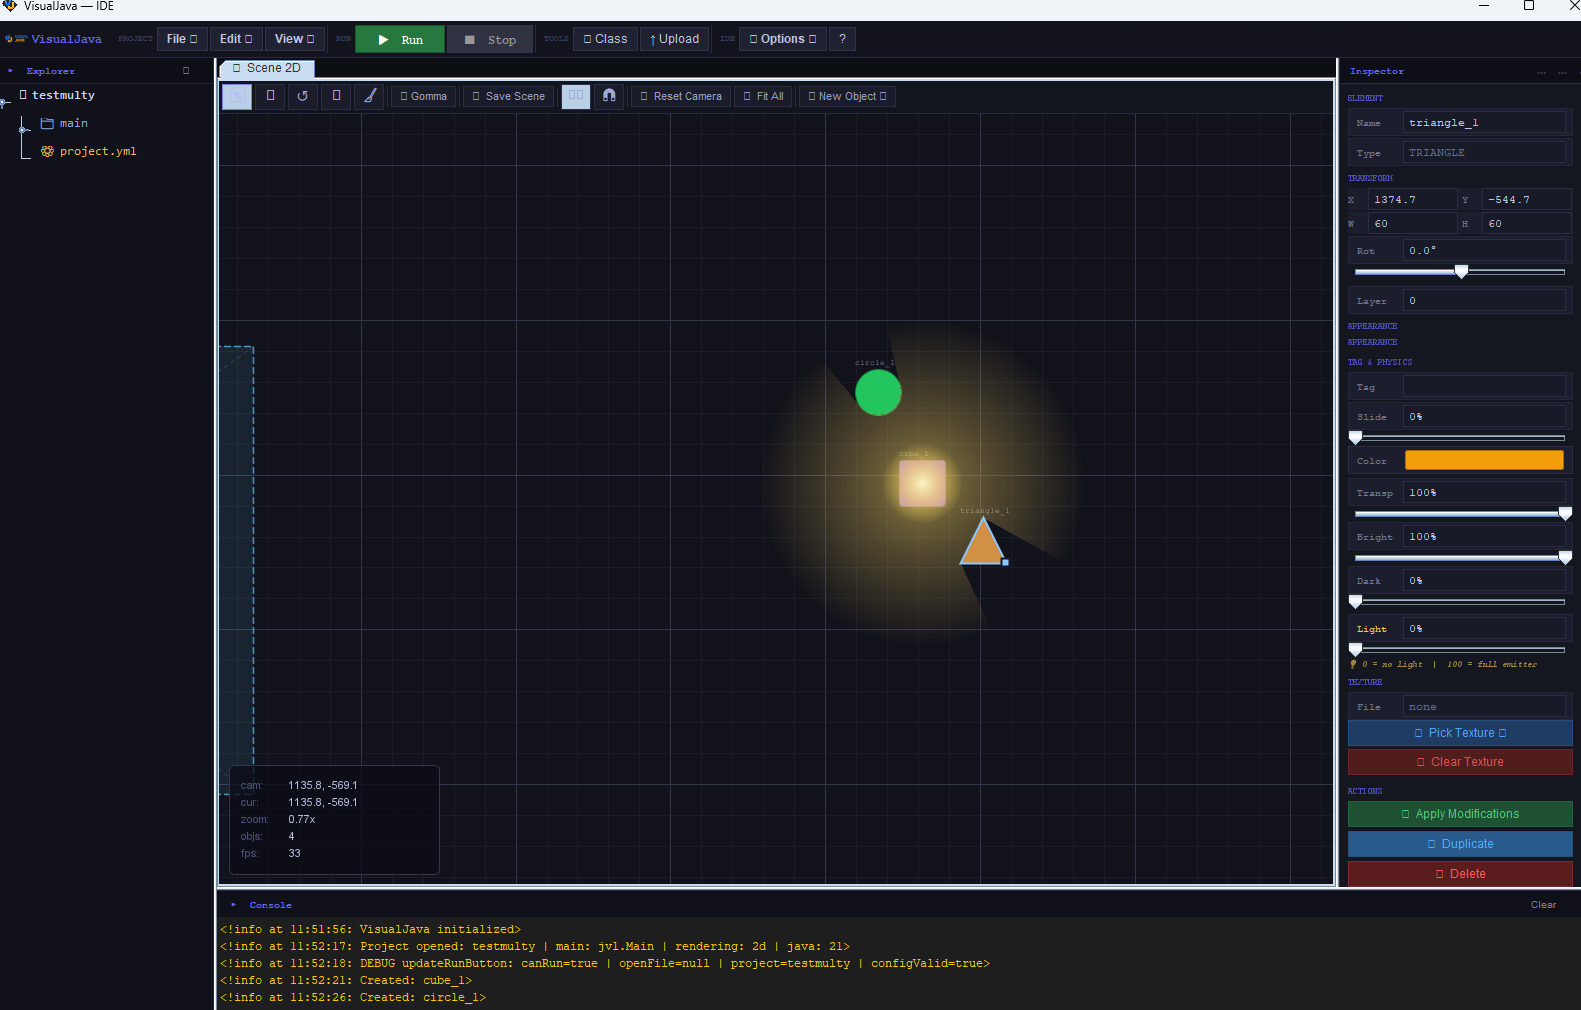
| Tool | What it does |
|---|---|
| Select / Move / Rotate | Switch the cursor mode to pick objects, drag them, or rotate the selected one. |
| Gomma (Eraser) | Removes the object you click on from the scene. |
| Save Scene | Writes every object's current transform and appearance back to its .vj resource file. |
| Reset Camera / Fit All | Recenters the editor camera, or zooms to fit every object on screen. |
| New Object | Adds a rectangle, circle or triangle at the camera's center — start here for a new shape. |
Selecting an object fills the Inspector on the right with everything about it:
Scene.findByTag(...), and a slide/friction value.Changes apply live once you press Apply Modifications; Duplicate clones the selection, Delete removes it.
Build the layout visually, name every object you'll need from code (the Name field), then reference it with VJObject.load("player", "resources/vj/player.vj") in Main.jvl — see Objects for the full pattern.
L'editor di scena 2D è dove definisci l'aspetto di una scena prima di scrivere una sola riga di comportamento. Si apre nella tab Scene 2D, accanto alle tue tab di codice.
| Strumento | Cosa fa |
|---|---|
| Select / Move / Rotate | Cambia la modalità del cursore per selezionare oggetti, trascinarli o ruotare quello selezionato. |
| Gomma | Rimuove dalla scena l'oggetto su cui clicchi. |
| Save Scene | Scrive la trasformazione e l'aspetto attuali di ogni oggetto nel suo file risorsa .vj. |
| Reset Camera / Fit All | Ricentra la camera dell'editor, oppure esegue lo zoom per far entrare tutti gli oggetti a schermo. |
| New Object | Aggiunge un rettangolo, cerchio o triangolo al centro della camera — punto di partenza per una nuova forma. |
Selezionare un oggetto riempie l'Inspector a destra con tutte le sue informazioni:
Scene.findByTag(...), e un valore di slide/attrito.Le modifiche si applicano live premendo Apply Modifications; Duplicate clona la selezione, Delete la rimuove.
Costruisci il layout visivamente, dai un nome a ogni oggetto che ti servirà da codice (campo Name), poi richiamalo con VJObject.load("player", "resources/vj/player.vj") in Main.jvl — vedi Oggetti per il pattern completo.
The 3D editor shares the same panel layout as the 2D one, built on jMonkeyEngine instead of a 2D canvas. It's newer than the 2D workflow (introduced in 1.5, made functional in 1.7) and grows with each release.
A pixelation filter is available for a deliberately retro, low-res look layered on top of full 3D geometry and lighting — handy for combining a pixel-art aesthetic (like the engine's own icon) with real 3D scenes.
3D development became genuinely usable in 1.7: object placement, the fly camera, the gizmo and lighting are functional today, and the 3D-equivalent runtime API mirrors the 2D one (positions, rotation, camera control) so concepts you learn in 2D carry over.
L'editor 3D condivide lo stesso layout a pannelli di quello 2D, costruito su jMonkeyEngine invece che su un canvas 2D. È più recente del flusso 2D (introdotto nella 1.5, reso funzionale nella 1.7) e cresce a ogni release.
È disponibile un filtro di pixelazione per un look volutamente retro e a bassa risoluzione, sovrapposto a geometria e illuminazione 3D complete — utile per combinare un'estetica pixel-art (come l'icona stessa del motore) con scene realmente 3D.
Lo sviluppo 3D è diventato realmente utilizzabile nella 1.7: posizionamento oggetti, fly camera, gizmo e illuminazione sono funzionali oggi, e l'API runtime equivalente per il 3D rispecchia quella 2D (posizioni, rotazione, controllo camera) così i concetti imparati in 2D si trasferiscono.
A VJObject is the base unit of anything visible in a scene — a rectangle, circle, triangle or image, with position, size, rotation, color and physics. You can get one of three ways.
VJObject player = VJObject.rect("player", 100, 300, 40, 40, Color.CYAN);
VJObject enemy  = VJObject.circle("enemy", 500, 300, 40, Color.RED);
VJObject logo   = VJObject.createImage("logo", "resources/logo.png", 0, -200, 96, 96);
This is the fastest way to prototype: no editor step needed, the object appears in the running scene as soon as the line executes.
Place and style the object visually (see Scene Editor 2D), name it, and Save Scene. Then pull it into code by its resource path — its transform, color, texture and rotation come along automatically:
VJObject player = VJObject.load("player", "resources/vj/player.vj");The first argument is the name you'll use from now on in code; it doesn't need to match the file name. Loading removes the static copy the editor drew and replaces it with a live object your code fully controls.
A shorthand for the same idea, resolved at compile time instead of a runtime call:
import: resources.vj.player;

// generates a ready-made wrapper exposing:
player.setpos(x, y);
player.moveX(dx);  player.moveY(dy);
player.setColor(r, g, b);
player.setRotation(deg); player.rotate(deg);
player.getX(); player.getY(); player.getRotation();player.moveX(4); // move relative to current X
player.moveY(-2);
player.move(3); // move forward along current rotation
player.setPos(120, 40);
player.setRotation(90);
player.rotate(15); // relative
player.setColor(255, 90, 0);
player.setSize(48, 48);
player.setLayer(2); // draw order
player.hide(); player.show();
if (player.touch(enemy)) {
    System.print("Hit!");
    player.kill();
}

VJObject bullet = enemy.clone("bullet"); // spawn a tagged copy at enemy's position
bullet.fadeOut(400);                      // tween alpha to 0 over 400ms
The full method list — every getter, setter, tween and collision hook on VJObject — is documented with signatures on the Code & API page.
Un VJObject è l'unità base di tutto ciò che è visibile in una scena — un rettangolo, cerchio, triangolo o immagine, con posizione, dimensione, rotazione, colore e fisica. Puoi ottenerne uno in tre modi.
VJObject player = VJObject.rect("player", 100, 300, 40, 40, Color.CYAN);
VJObject enemy  = VJObject.circle("enemy", 500, 300, 40, Color.RED);
VJObject logo   = VJObject.createImage("logo", "resources/logo.png", 0, -200, 96, 96);
È il modo più rapido per prototipare: nessun passaggio nell'editor, l'oggetto appare nella scena in esecuzione non appena la riga viene eseguita.
Posiziona e configura l'oggetto visivamente (vedi Editor di scena 2D), dagli un nome e premi Save Scene. Poi richiamalo da codice tramite il suo percorso risorsa — trasformazione, colore, texture e rotazione arrivano automaticamente:
VJObject player = VJObject.load("player", "resources/vj/player.vj");Il primo argomento è il nome che userai da quel momento nel codice; non deve corrispondere al nome del file. Il caricamento rimuove la copia statica disegnata dall'editor e la sostituisce con un oggetto vivo controllato interamente dal tuo codice.
Una scorciatoia per la stessa idea, risolta in fase di compilazione invece che con una chiamata a runtime:
import: resources.vj.player;

// genera un wrapper già pronto che espone:
player.setpos(x, y);
player.moveX(dx);  player.moveY(dy);
player.setColor(r, g, b);
player.setRotation(deg); player.rotate(deg);
player.getX(); player.getY(); player.getRotation();player.moveX(4); // sposta relativamente alla X attuale
player.moveY(-2);
player.move(3); // avanza lungo la rotazione attuale
player.setPos(120, 40);
player.setRotation(90);
player.rotate(15); // relativo
player.setColor(255, 90, 0);
player.setSize(48, 48);
player.setLayer(2); // ordine di disegno
player.hide(); player.show();
if (player.touch(enemy)) {
    System.print("Hit!");
    player.kill();
}

VJObject bullet = enemy.clone("bullet"); // crea una copia con tag alla posizione di enemy
bullet.fadeOut(400);                      // anima l'alpha a 0 in 400ms
L'elenco completo dei metodi — ogni getter, setter, tween e hook di collisione su VJObject — è documentato con le firme nella pagina Codice & API.
Events are the backbone of any JVL program: instead of writing your own game loop, you describe what happens at each moment and let the runtime call it.
class Main {

    VJObject player;

    @onStart
    void setup() {
        player = VJObject.rect("player", 0, 0, 40, 40, Color.CYAN);
        System.print("Ready.");
    }

    @onUpdate
    void loop() {
        if (KEY_RIGHT) player.moveX(4);
        if (KEY_LEFT)  player.moveX(-4);
    }

    @onKeyPress
    void keys(String key) {
        if (key.equals("SPACE")) player.rotate(90);
    }

    @onClick
    void click() {
        System.print("Clicked at " + Mouse.getX() + ", " + Mouse.getY());
    }

    void Main(String[] args) {
        System.print("Starting...");
    }
}
You can declare as many @onUpdate or @onKeyPress methods as you like, across as many classes as you like — Visual Java runs all of them every frame/keypress, in the order the files were compiled.
Gli eventi sono la spina dorsale di ogni programma JVL: invece di scrivere il tuo game loop, descrivi cosa succede in ogni momento e lasci che sia il runtime a chiamarlo.
class Main {

    VJObject player;

    @onStart
    void setup() {
        player = VJObject.rect("player", 0, 0, 40, 40, Color.CYAN);
        System.print("Ready.");
    }

    @onUpdate
    void loop() {
        if (KEY_RIGHT) player.moveX(4);
        if (KEY_LEFT)  player.moveX(-4);
    }

    @onKeyPress
    void keys(String key) {
        if (key.equals("SPACE")) player.rotate(90);
    }

    @onClick
    void click() {
        System.print("Clicked at " + Mouse.getX() + ", " + Mouse.getY());
    }

    void Main(String[] args) {
        System.print("Starting...");
    }
}
Puoi dichiarare quanti metodi @onUpdate o @onKeyPress vuoi, in tante classi quante vuoi — Visual Java li esegue tutti a ogni frame/pressione di tasto, nell'ordine in cui i file sono stati compilati.
Split a project across several .jvl files and call between them without imports — the preprocessor builds a shared registry of every class before it translates any of them.
// Enemy.jvl
class Enemy {

    VJObject self;

    void spawn(double x, double y, int speed) {
        self = VJObject.circle("enemy", x, y, 40, Color.RED);
    }

    @onUpdate
    void patrol() {
        self.moveX(2);
    }
}

// Main.jvl
class Main {
    void Main(String[] args) {
        Enemy.spawn(x = 500, y = 300, speed = 3); // named parameters, any order
    }
}Enemy(); with no method name runs every no-argument, non-event method Enemy declares, in declaration order — useful for a class that's really a sequence of setup steps rather than an object with state.
Dividi un progetto su più file .jvl e chiama tra loro senza import — il preprocessore costruisce un registro condiviso di tutte le classi prima di tradurne una qualsiasi.
// Enemy.jvl
class Enemy {

    VJObject self;

    void spawn(double x, double y, int speed) {
        self = VJObject.circle("enemy", x, y, 40, Color.RED);
    }

    @onUpdate
    void patrol() {
        self.moveX(2);
    }
}

// Main.jvl
class Main {
    void Main(String[] args) {
        Enemy.spawn(x = 500, y = 300, speed = 3); // parametri nominati, in qualsiasi ordine
    }
}Enemy(); senza nome di metodo esegue tutti i metodi senza argomenti e non-evento dichiarati da Enemy, nell'ordine di dichiarazione — utile per una classe che è in realtà una sequenza di passi di setup piuttosto che un oggetto con stato.
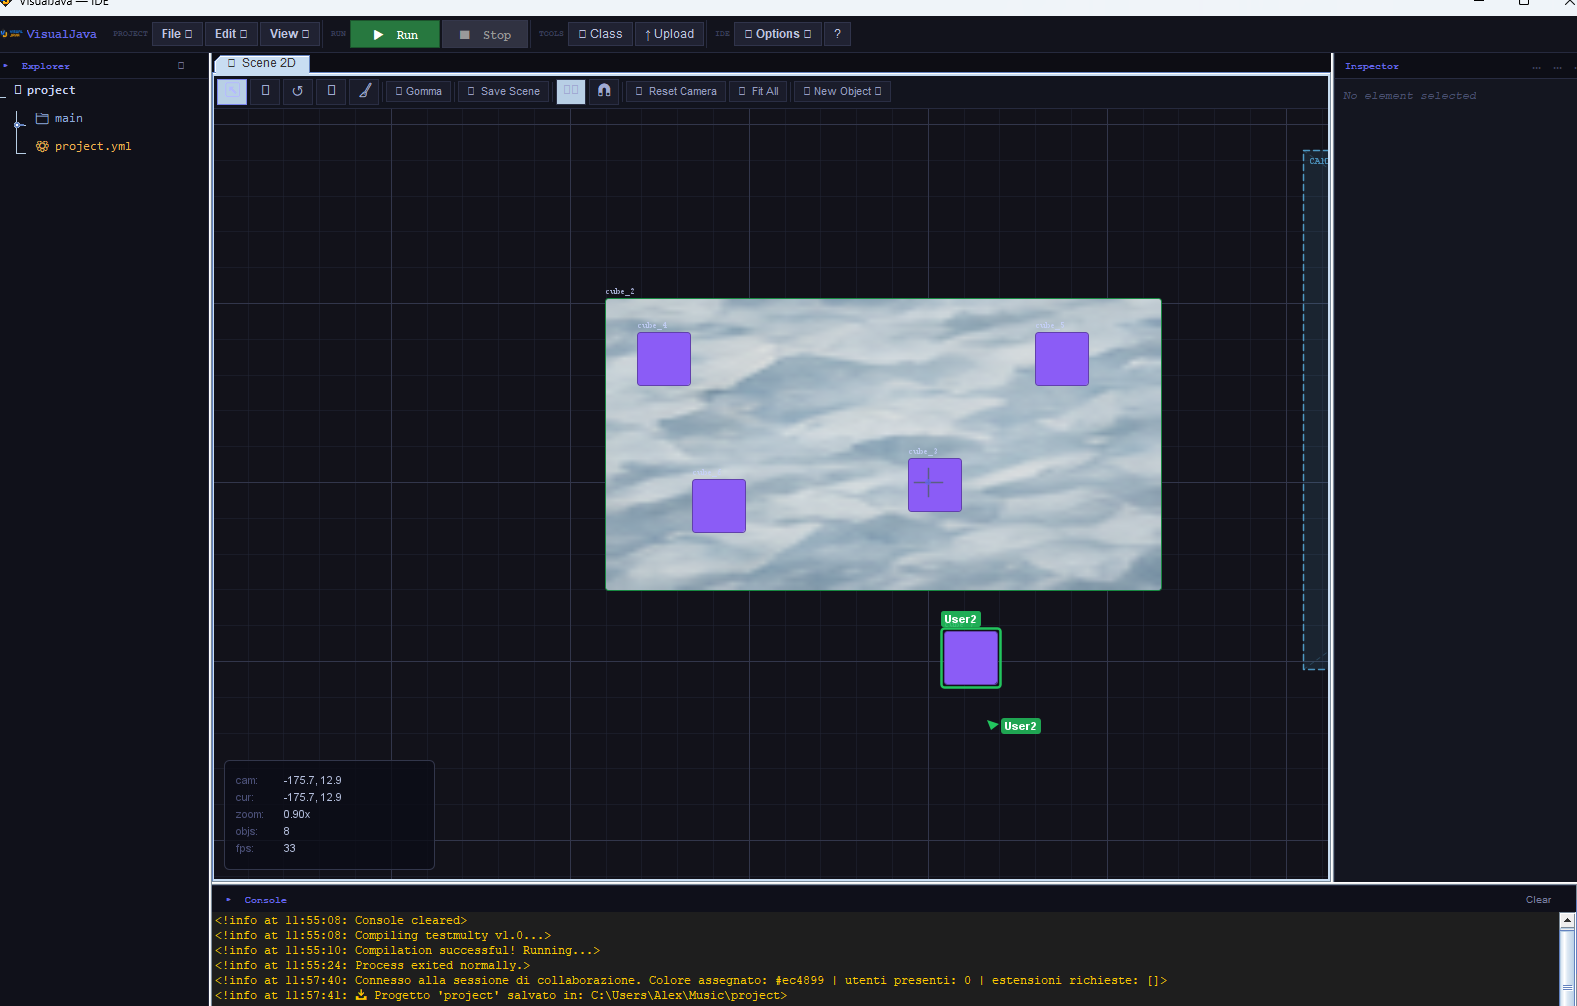
Visual Java can host a lightweight local collaboration session: open the collaboration panel, share the session with a teammate on your network, and both editors will show every connected user's cursor and camera live inside the same 2D or 3D scene, each tagged with a name and an assigned color.
Collaboration works at the scene level: object edits, new objects and camera movement sync between sessions, so it's best suited to pairing on level layout, lighting and object placement rather than simultaneous code editing.
Visual Java può ospitare una leggera sessione di collaborazione locale: apri il pannello di collaborazione, condividi la sessione con un collega sulla tua rete, ed entrambi gli editor mostreranno live il cursore e la camera di ogni utente connesso dentro la stessa scena 2D o 3D, ciascuno etichettato con un nome e un colore assegnato.
La collaborazione funziona a livello di scena: modifiche agli oggetti, nuovi oggetti e movimento della camera si sincronizzano tra le sessioni, quindi è più adatta a lavorare insieme su layout dei livelli, illuminazione e posizionamento oggetti piuttosto che sulla modifica simultanea del codice.
Since 1.6, Visual Java can load plugins that extend the IDE itself — additional tools, panels or project templates — through a dedicated plugin manager. Plugin loading is aimed at extending the editor experience, distinct from the Minecraft plugin development features described next.
Dalla 1.6, Visual Java può caricare plugin che estendono l'IDE stesso — strumenti aggiuntivi, pannelli o template di progetto — tramite un plugin manager dedicato. Il caricamento dei plugin serve a estendere l'esperienza dell'editor, distinto dalle funzionalità di sviluppo di plugin Minecraft descritte di seguito.
New in 1.7: Visual Java can target Minecraft server plugin development for Paper, Spigot and Bukkit, with a version selector covering Minecraft 1.8 through 1.21.10. Early support includes basic commands, an event system, and a tag-based system for marking entities, blocks and items — built on the same JVL class/event model used for 2D and 3D projects, so the mental model carries over even though this surface is still evolving quickly.
This is the newest, least stable part of the engine. Expect API changes between releases; check the changelog before upgrading a Minecraft project.
Novità della 1.7: Visual Java può essere usato per sviluppare plugin server Minecraft per Paper, Spigot e Bukkit, con un selettore di versione che copre Minecraft dalla 1.8 alla 1.21.10. Il supporto iniziale include comandi di base, un sistema di eventi e un sistema basato su tag per contrassegnare entità, blocchi e oggetti — costruito sullo stesso modello di classi/eventi JVL usato per i progetti 2D e 3D, quindi il modello mentale si trasferisce anche se questa parte è ancora in rapida evoluzione.
Questa è la parte più recente e meno stabile del motore. Aspettati cambiamenti nell'API tra una release e l'altra; controlla il changelog prima di aggiornare un progetto Minecraft.
 Visual